
Tuesday, April 28, 2009
Welcome, Spring!
According to the calendar, today is the first day of Spring! The Daffodils have broken through the mulch covering but the temperatures are still cool with a high today in the upper 30s and low 40s. The sun is shining and the skies are blue... But then there is that winter storm watch issued last night by the National Weather Service: "A Late Season Winter Storm System Will Have The Potential To Produce Significant Snowfall Amounts Friday Into Saturday Morning Across Much Of Northern Indiana...Southwest Lower Michigan...And Northwest Ohio. Snowfall Accumulations Of 4 To 8 Inches Will Be Possible Before Tapering Off Saturday Morning." Hopefully, this will be the last snow storm this winter, after all, Spring Has Arrived!
Sunday, April 26, 2009
Fluttering About: the Papillionaire Sommer

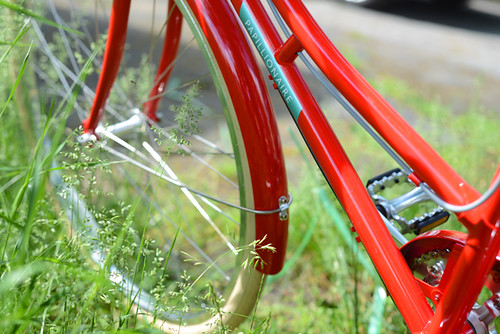
One of the newer members of the upright city bike club, the AustralianPapillionaire (a sponsor of this blog) has recently opened its doors in the USA and sent me a bicycle to try - their step-through Sommer model in the aptly named "Boston" colour scheme. Based on a traditional European loop-frame design and available in a range of candy colours, the lugged steel Sommer also comes with an attractive price tag - starting at $429 for a basic single speed bicycle, including fenders, chainguard and rear rack.
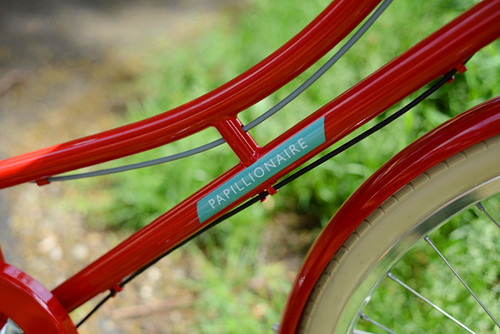
Founded in by a brother and sister team in Melbourne,the Papillionaire name is based on the Latin word for butterfly (papillio)- reflecting their philosophy that "riding should be easy and fun and of course look good at the same time."
The bicycle frames are designed at Papillionaire's Australian office and manufactured in Taiwan to their specs, along with the rear racks, and custom leather grips and saddles. The finish is powdercoat.The stated weight of the complete bike is 29lb.
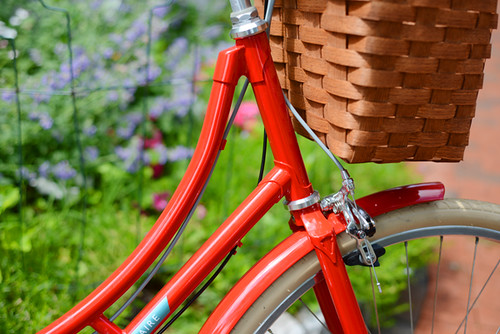
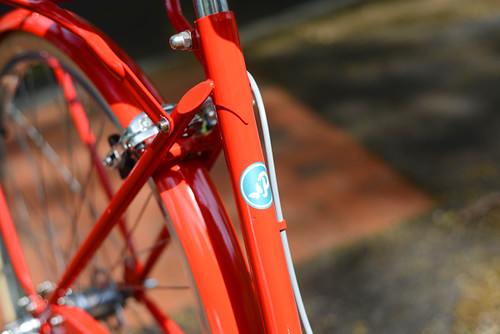
The cro-moly frames are lugged and the fork features an attractive crown with cutout detail.
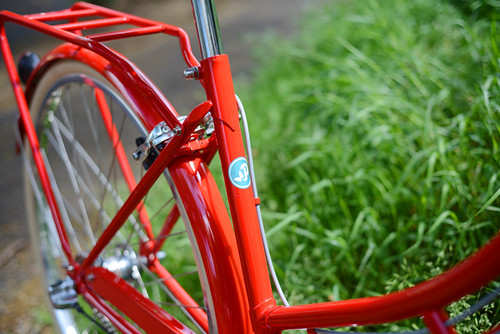
Here is a look at the seat cluster.
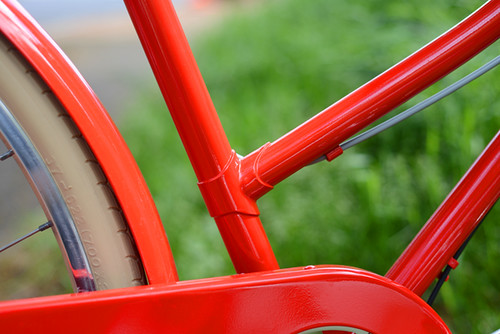
And the junction of the curved top tube with the seat tube.
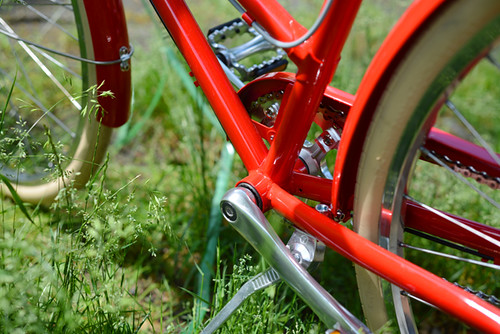
The bottom bracket is the only lugless joint on the frame, and it is done smoothly.
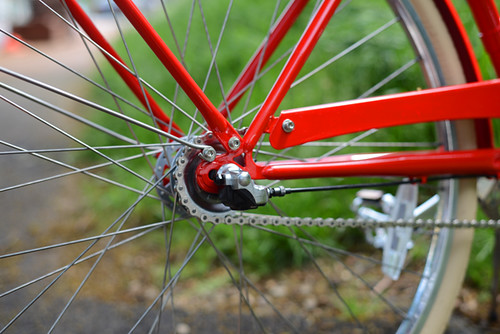
The horizontal dropouts in the rear accommodate hub gearing and incorporate braze-ons for rack mounts, fender mounts and chainguard bracket.
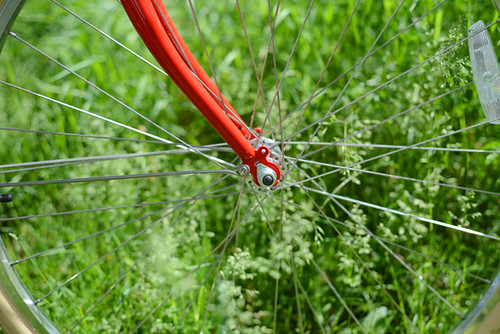
Braze-ons for both fenders and front rack on the fork dropouts as well.
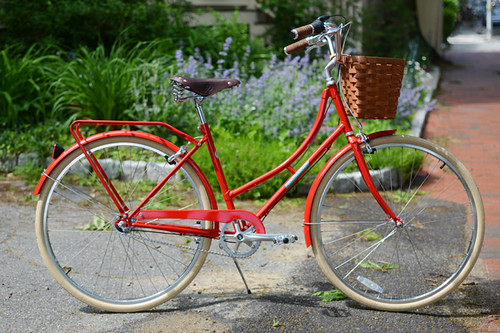
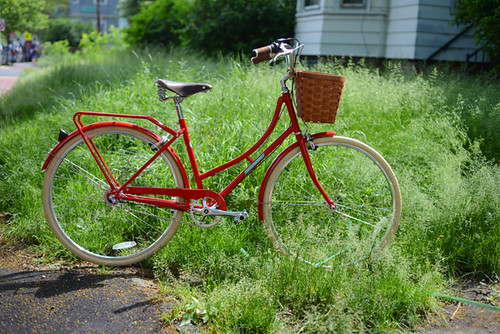
The Sommer comes in two sizes: standard and small.Aside from the curved top tube, a main distinguishing feature of this model is its handlebars: Somewhere between North Roads and Apehanger on the upright spectrum, the bars have quite a rise to them. This has the interesting visual effect of making the rest of the bike appear miniature, almost toy-like in comparison. In fact the bike is normal sized, with 700C wheels to boot - it's just that the handlebars are quite massive - intended, in combination with a short top tube, to achieve a super-upright riding position.

View of the bars from the rider's perspective.
And a side view of the rise. Note that the stem here is shown lowered to maximum capacity.
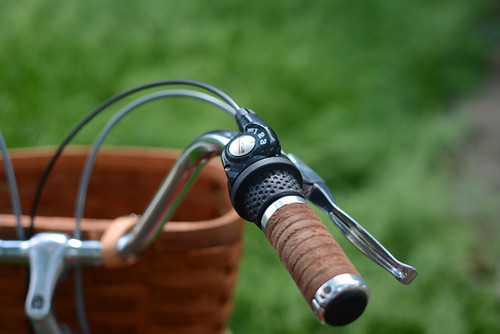
The test bike I received was set up as a 3-speed, with a Shimano Nexus hub and twist shifter, front and rear caliper brakes,
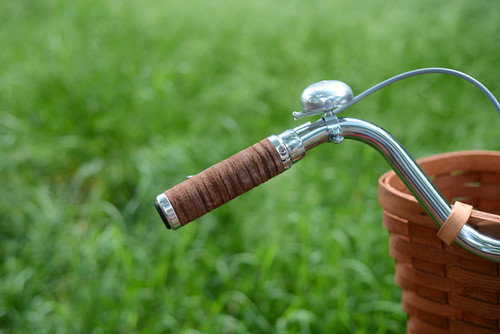
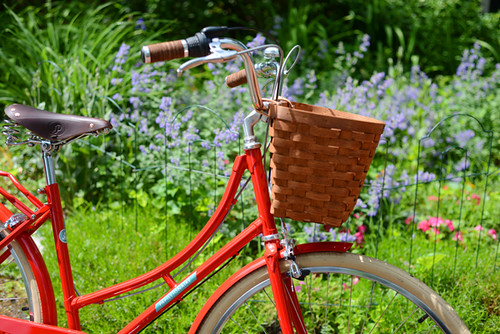
Papillionaire's leather grips (a copy of the Brooks version, it seems), a silver bell,
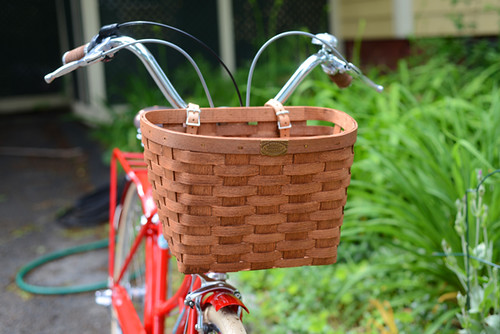
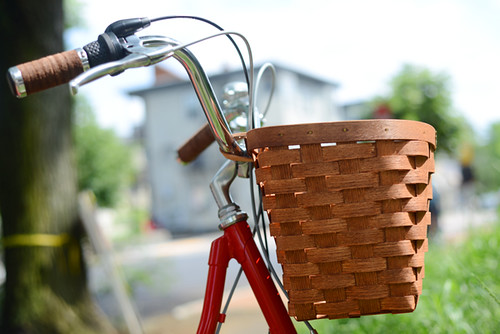
a Peterboro front basket (big enough to fit a handbag or similar),
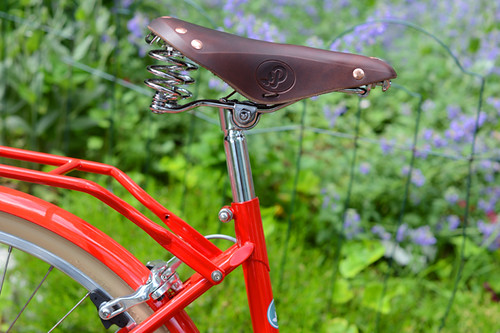
and a sprung leather saddle (looks to be Gyes-made), embossed with Papillionaire's logo. Note that the saddle here is shown sitting pretty far forward, with the clamp not allowing further backward movement. A setback seatpost is now available to get the saddle a bit further back.
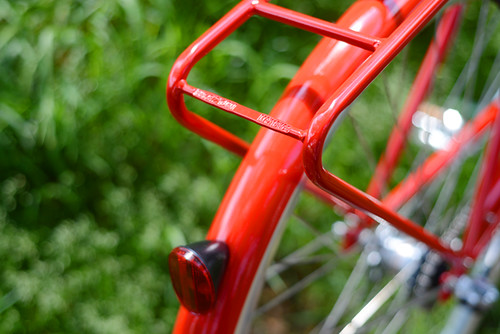
The Sommer's rear rack is rated for 18kg (40lb) of weight. No lighting is included with the bike, but the rear fender is drilled for a tail light, and a rear reflector is included. The fenders, rack and chainguard are all powder-coated to match the bicycle's frame.
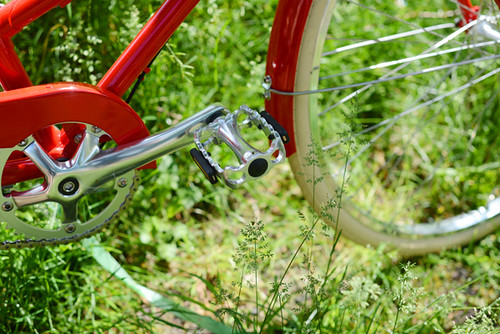
The alloy touring-stlye pedals come with reflectors.
The 700Cx35mm Kenda West city tires are available in gumwall or cream.
The Papillionaire was delivered to a nearby shop, the Bicycle Belle (read about it here), where I test rode it on a 4 mile urban loop simulating some of my usual local commutes.
Nothing about Papillionaire's branding suggests a focus on performance and speed, and so the bicycle's tame handling was consistent with my expectations. The Sommer is a bike for fluttering about town, not for "super commuting" 10 miles up hilly country roads. At the same time, the gearing is set quite low - so reasonable urban inclines are not difficult to tackle. And the roomy, integrated rear rack is a convenient standard feature, making it immediately possible to attach panniers, as well as rack-top bags and baskets to the bike.
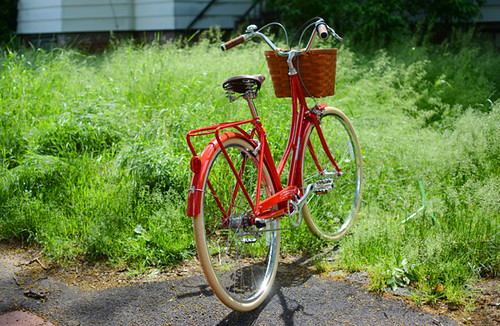
On the whole, my impression of the Sommer was dominated by its bolt-upright positioning and tight "cockpit." Seated upon the saddle, my back was as straight as if I'd been sitting in a chair, and my hands gripped the handlebars just forward of my ribcage. The new setback seatpost alters these proportions, but only slightly: The Sommer was deliberately designed to be extremely upright. Those looking for that sort of fit will appreciate that, while those seeking a more leaned-forward, active position, may find the proportions limiting.
Another notable feature of the Sommer is its very high bottom bracket. Those who enjoy being perched as high as possible on a city bike so as to "see above traffic" will appreciate this. Those who like to stop with a toe on the ground without getting off the saddle, may not: The high bottom bracket will make it difficult to set the saddle height to make this possible whilst achieving full leg extension on the downstroke when pedaling.
While Papillionaire refers to their bicycles as "Dutch-style," theSommer is not a typical Dutch Omafiets. They do have the upright positioning in common. But the Sommer's frame angles are not as relaxed and the fork is not as raked-out - giving it a more compact, less boat-like - and also less cushy - feel than that of a traditional Dutch bike. The Sommer's combination of tight frame, 700C wheels and wide tires also leaves very little toe clearance with the front wheel; some riders may experience toe overlap.
The 29lb stated weight figure feels pretty accurate; for a bike of its kind the Sommer is on the lightweight side. But note, that (to be fair, like most bikes in its price category) the Sommer does not come with lighting options - something I hope Papillionaire (and other manufacturers) will consider remedying, since the bike is intended for regular commuting.
Since Papillionaire expanded its market to the US, I'vereceived regular emails from readers asking how it compares to the popular Bobbin Birdie(see reviewhere).As far as apples-to-apples comparisons with other city bikes, I think this is a fair one: Like the Sommer, the Birdie isa Taiwan-made lugged cro-moly loop frame with hub gears, fenders, chainguard and rear rack, at a similar price point. As far as quality, I find the bikes equivalent - from the finish, to the components, to bike shop mechanics' feedback on the quality of the from-the-factory assembly. As far as frame design and ride feel, there are notable differences: The Sommer is a considerably more upright bike, and it is fitted with 700C wheels, whereas the Birdie is a 26" wheel bike with a position that (while still firmly in the upright category) is more aggressive, and to me feels more responsive. So the choice between the two will likely rest on the type of fit and ride quality a cyclist prefers. Go with Papillionaire if you want to be more upright and higher off the ground; with Bobbin if the reverse. Price-wise both are pretty good deals. I get so many inquiries from readers looking for new, but "vintage-style" upright bicycles at reasonable prices. It's great to have multiple options in the sub-$700 price range.
The Papillionaire Sommer as shown here (the 3-speed version, with leather accessories and basket) is priced at $629, and is available to test ride at the Bicycle Belle in Somerville, MA. Aside from the Sommer model, Papillionaire also offers a diamond frame and, most recently, a mixte. You can check out the specs and colours of all their modelshereand see the complete Sommer picture set here. Many thanks to Papilllionaire and Bicycle Belle for the opportunity to try this bike!
Friday, April 24, 2009
Rainier After the Storm!

After receiving nearly 8 ft. of snow over the past week at Paradise, the mountain is looking particularly PHAT!(View from the Tatoosh)
Monday, April 20, 2009
Tehan Creek

Tehan Creek, originally uploaded by ParsecTraveller.
Here's a photo from a bushwhack hike that I went on yesterday, to Tehan Falls in Pleasanton Ridge Regional Park.
A few scattered reports I had read indicated that Tehan Falls was a 60-foot gem, complete with a fern grotto.
Well, Tehan Falls was 60 feet tall, and it had a fern grotto, but the amount of water was almost laughable, considering just how much rain we've had in the past week. It's surprising to think that the falls were even marked on a map.
Anyways, this is a shot of the creek downstream from the falls where it was lush and ferny.
Thoughts on RootsTech
Much has already been written about the RootsTech Conference, which was held last week in Salt Lake City. Randy Seaver has compiled a list of Geneablogger posts in his post RootsTech .. Geneabloggers Review. But I thought I'd add my two cents worth...
I managed to arrive on time for the keynote speakers on Thursday morning in spite of having to remove two inches of heavy, wet snow off of Van Dora and then driving in "rush hour" traffic through the valley. That drive stressed me out so much that I decided to forgo the keynote addresses on Friday and Saturday - knowing too that they were being recorded and would be available for viewing later.
I'm not going to give a run-down of the sessions that I attended but will just say that with 6700+ people in attendance, most rooms were crowded. There were several sessions I wanted to attend but couldn't because the room was already at capacity when I arrived 5-10 minutes before they were due to start!
This year I decided to attend sessions on topics that I knew very little about. For the most part, that strategy worked out well. However, I had a big issue with the descriptions of some of the sessions and the fact that very few were identified as Intermediate level. The bigger issue, however, is that several sessions identified as Intermediate were definitely not. And, the titles of some sessions were misleading.
One session, billed as "using technology to solve research problems," was very disappointing. In my opinion, it was a basic beginners level overview of how to do your genealogy - the only "technology" mentioned was the use of the internet and genealogy software. In fact, the speaker, after polling the audience to determine our research level, stated that she expected more beginners to attend.

Some of the highlights... learning about the Genographic Project, picking up some ideas from Denise Olson on using Powerpoint (or other presentation software) to tell short family stories with pictures (photo above), and learning that Thomas W. Jones utilizes online family trees in his research process.

On that latter point, the Thomas Jones session "Can a Complex Research Problem Be Solved Solely Online?" was worth being stuffed into the smallest room available. The session was unlike any other I attended - an interactive experience with the audience responding to questions regarding resources that might be used and then learning from 'the master' what was actually used. Can you imagine getting an email from Tom Jones inquiring about the sources for your online tree?
Will I attend RootsTech next year? Doubtful. But then, that's what I said last year! I think a better option for me is to watch the sessions that are live-streamed and archived for later viewing. Also, if they follow through on their plans to have 600+ locations holding sessions locally at the same time in conjunction with live-streaming - well, that would be awesome.

The downside of attending virtually, of
course, is that you miss out on the interaction with other attendees
and spending time with friends. But if RootsTech grows in attendance
next year like it did this year, the current venue would be
impossibly crowded...
I managed to arrive on time for the keynote speakers on Thursday morning in spite of having to remove two inches of heavy, wet snow off of Van Dora and then driving in "rush hour" traffic through the valley. That drive stressed me out so much that I decided to forgo the keynote addresses on Friday and Saturday - knowing too that they were being recorded and would be available for viewing later.
I'm not going to give a run-down of the sessions that I attended but will just say that with 6700+ people in attendance, most rooms were crowded. There were several sessions I wanted to attend but couldn't because the room was already at capacity when I arrived 5-10 minutes before they were due to start!
This year I decided to attend sessions on topics that I knew very little about. For the most part, that strategy worked out well. However, I had a big issue with the descriptions of some of the sessions and the fact that very few were identified as Intermediate level. The bigger issue, however, is that several sessions identified as Intermediate were definitely not. And, the titles of some sessions were misleading.
One session, billed as "using technology to solve research problems," was very disappointing. In my opinion, it was a basic beginners level overview of how to do your genealogy - the only "technology" mentioned was the use of the internet and genealogy software. In fact, the speaker, after polling the audience to determine our research level, stated that she expected more beginners to attend.
Some of the highlights... learning about the Genographic Project, picking up some ideas from Denise Olson on using Powerpoint (or other presentation software) to tell short family stories with pictures (photo above), and learning that Thomas W. Jones utilizes online family trees in his research process.
On that latter point, the Thomas Jones session "Can a Complex Research Problem Be Solved Solely Online?" was worth being stuffed into the smallest room available. The session was unlike any other I attended - an interactive experience with the audience responding to questions regarding resources that might be used and then learning from 'the master' what was actually used. Can you imagine getting an email from Tom Jones inquiring about the sources for your online tree?
Will I attend RootsTech next year? Doubtful. But then, that's what I said last year! I think a better option for me is to watch the sessions that are live-streamed and archived for later viewing. Also, if they follow through on their plans to have 600+ locations holding sessions locally at the same time in conjunction with live-streaming - well, that would be awesome.
The downside of attending virtually, of
course, is that you miss out on the interaction with other attendees
and spending time with friends. But if RootsTech grows in attendance
next year like it did this year, the current venue would be
impossibly crowded...
More new leashless gloves.
The last two winters some of my favorite climbing gloves have been by Mountain Hardware.
Specifically a $50 "go to" glove for me, the "Torsion" (or it's kissing cousin the OR Vert). The Torsion isn't totally water proof but works great on steep technical ice unless it is really wet. For colder conditions or a lot of water I have been using the OutDry lined "Hydra" which is a stellar technical glove and cheap for what you get I think, at $100. It is warmer than the Torsion but still light enough to climb hard in. It is an exceptional pattern for technical climbing leashless. More details on both of these gloves back a ways in the Blog. Worth the extra click if you are are looking for gloves.
The new gloves to me....


Just picked up two of Mtn Hardware's glove styles that are new to me and I think worth checking out. Although prices have obviously gone up. Both are again lined with OutDry. Which seems to really work better than Gortex in similar styles. And both are leather reinforced in the heavy wear areas. The "Pistolero" as a light weight, mostly leather, highly technical glove that will replace my Torsions I think by the feel of them @ $100. And a slightly warmer version of the "Hydra", with a removable wool/synthetic liner, the "Typhon" @ $130.00
I get to look at a lot of gloves locally with REI, Mtn Hardware, Feathered Friends and Marmot all having good size retail stores local to me . These two models from Mtn Hardware are some of the best I have seen for my own use. Gotta like Mountain Hardware's life time warranty as well when you are dropping C notes for a single pair of gloves likely to get trashed in less than a season.
Fit? I wear a XL in most every glove. And it needs to be a generous XL. Hydra is fine in the XL, maybe a little loose. Pistolero is perfect, same slightly loose fit. The Typhoon is a little tight, maybe the same sizing pattern (I'd bet $ it is) as the XL Hydra but the wool/synthetic liner makes them a little tight. I may be wrong on the sizing because the next two pairs I mail ordered don't fit tight even with the wool liners. The glove build pattern however is not the same. The Hydra still has less seams and less bulk because of it. Looks like enough improvement on the Hydra durability wise though with the dbl thickness leather wear pads and leather finger tips to risk it and pay the extra $30. if you are going to do a lot of raps in them. The wool liners aren't worth the extra $30 to me. But I was thinking a really light polar fleece liner would work better and seems similar to the close fit as my BD liners in the Hydra.
I tried on 3 pairs of each to make sure I got the biggest pairs and all seem the same in size.
If I wore a Large and wanted a warmer glove than the Hydra the XL Typhon would rock :) But a XL Hydra would as well with a light weight liner of your choice and save $30.
There are a few minor improvements and the extra leather reinforcement in the palm and fingers on the Typhon. But the Typhon's build pattern is way more complicated and a bit more bulky. Are the changes worth the extra $30.00 compared to the Hydra for you? It is a toss up for me but it has convinced me to use the Typhon as my cold weather rap glove and save the Hydra for climbing when I can.
I'll write more once I get to use them as intended.
Specifically a $50 "go to" glove for me, the "Torsion" (or it's kissing cousin the OR Vert). The Torsion isn't totally water proof but works great on steep technical ice unless it is really wet. For colder conditions or a lot of water I have been using the OutDry lined "Hydra" which is a stellar technical glove and cheap for what you get I think, at $100. It is warmer than the Torsion but still light enough to climb hard in. It is an exceptional pattern for technical climbing leashless. More details on both of these gloves back a ways in the Blog. Worth the extra click if you are are looking for gloves.
The new gloves to me....
Just picked up two of Mtn Hardware's glove styles that are new to me and I think worth checking out. Although prices have obviously gone up. Both are again lined with OutDry. Which seems to really work better than Gortex in similar styles. And both are leather reinforced in the heavy wear areas. The "Pistolero" as a light weight, mostly leather, highly technical glove that will replace my Torsions I think by the feel of them @ $100. And a slightly warmer version of the "Hydra", with a removable wool/synthetic liner, the "Typhon" @ $130.00
I get to look at a lot of gloves locally with REI, Mtn Hardware, Feathered Friends and Marmot all having good size retail stores local to me . These two models from Mtn Hardware are some of the best I have seen for my own use. Gotta like Mountain Hardware's life time warranty as well when you are dropping C notes for a single pair of gloves likely to get trashed in less than a season.
Fit? I wear a XL in most every glove. And it needs to be a generous XL. Hydra is fine in the XL, maybe a little loose. Pistolero is perfect, same slightly loose fit. The Typhoon is a little tight, maybe the same sizing pattern (I'd bet $ it is) as the XL Hydra but the wool/synthetic liner makes them a little tight. I may be wrong on the sizing because the next two pairs I mail ordered don't fit tight even with the wool liners. The glove build pattern however is not the same. The Hydra still has less seams and less bulk because of it. Looks like enough improvement on the Hydra durability wise though with the dbl thickness leather wear pads and leather finger tips to risk it and pay the extra $30. if you are going to do a lot of raps in them. The wool liners aren't worth the extra $30 to me. But I was thinking a really light polar fleece liner would work better and seems similar to the close fit as my BD liners in the Hydra.
I tried on 3 pairs of each to make sure I got the biggest pairs and all seem the same in size.
If I wore a Large and wanted a warmer glove than the Hydra the XL Typhon would rock :) But a XL Hydra would as well with a light weight liner of your choice and save $30.
There are a few minor improvements and the extra leather reinforcement in the palm and fingers on the Typhon. But the Typhon's build pattern is way more complicated and a bit more bulky. Are the changes worth the extra $30.00 compared to the Hydra for you? It is a toss up for me but it has convinced me to use the Typhon as my cold weather rap glove and save the Hydra for climbing when I can.
I'll write more once I get to use them as intended.
Saturday, April 18, 2009
South Early Winter Spire SW Rib ..
Elevation Gain: 2600'
5 miles RT
Left car: 11:15 am
Summit: 7:30 pm
Back at car: 10:00 pm
11 hours car to car
Steve and I planned a big climbing weekend. We didn't finalize our objectives until a few days before the weekend. The first leg would be an attempt on the Southwest Rib of South Early Winter Spire. Our plan was to climb South Early on Saturday, and then head to Cascade Pass to climb Forbidden on Sunday/Monday.
We had a casual start from Seattle on Saturday and arrived at the Blue Lake trail head in the late morning. Temps were cool, and it was a bit cloudy. We made awesome time to the base where we ate lunch and started to gear up. (And Steve took a "bathroom break".) There was a party on route ahead of us and they were a few pitches up. We hung our remaining gear in the tree, and headed up the direct start. [Using the description from Weekend Rock.]
Steve led off on the first pitch which was a loose and not easily protected corner. He went a little off route at one point (he called it the 5.10 variation) and was finally at the belay. I followed and found the pitch a struggle, and mostly unenjoyable. The off route variation took me some time to complete as I couldn't manage the moves Steve did and did an even different variation. This off route issue on the first pitch burned a lot of time for us, (Steve thought over and hour) but we weren't too concerned.
I led off on the next pitch which was short and if we didn't go off route on the first pitch, probably could have been combined with it. This short pitch was a moderate crack that brought you up to the next belay just below a major flake that is the following pitch. We changed over leads and Steve was on his way.
This crack is wider and has an interesting design to it with a large edge as its left side. The crack was fairly steep, and Steve headed up it straddling the flake with one leg on the face and one in the crack. There was much grunting. (Not as much as from the woman who was ahead of us-I think she was actually crying at one point.) Steve made his way up and commented about the amount of blood on the rock. He combined the pitch with the following pitch and started to bring me up. I climbed the crack with both feet in for the initial part, and then about 1/3 of the way up I used the flake for feet as my feet were killing me from jamming them in the crack. The last third of the pitch you come out and lie back the final portion. Exciting to go from the relative security of the crack out on to the face. The second pitch of this link up was a wide crack in a slab.
 Top of the fourth pitch (photo by Steve Machuga)
It was my turn to lead the next pitch which was a slab pitch. It starts out by going around a corner and then up a nice slab with some exposure. The book description said somewhat runout, but it was oddly only runout for the crux, which in the book was stated as being "an exciting step to the right." It was a fun pitch and I set a gear belay at the base of the bear hug cracks and brought Steve up.
 Rounding the corner to gain the slab (photo by Steve Machuga)
Since I had told Steve at the base that I wanted to lead the bear hug cracks, he let me lead this next pitch as well. This was a super enjoyable pitch where you head up a short crack that brings you to a small ledge at the bottom of wide double cracks. They took a touch of effort to get on, but once on them, I found the climbing easy. What was not particularly easy was protecting them. We had brought a #5 Camalot just for this pitch (although we used it on 2-3 other pitches as well.) The bear hug cracks were too wide for the #4 and so I had to move the #5 up with me at least once. Just above the cracks I was able to get in a #4 and then proceeded up a ramp to the next belay, where I brought Steve up.
 Bear Hug Cracks (Photo by Steve Machuga)
Steve led out on the next bit and then we started simul-climbing. (This was roughly pitches seven and eight.) He belayed me up to just below the bunny ears, and then I led a short bit to the rap anchor at the bunny ears. We rapped off the scary (freestanding block) anchor into the notch. Then Steve led the final pitch up to the summit area. It was a fun little crack that brought you up to near the summit. Since it was late in the day and clouds seemed to be rolling in, we bypassed the summit block and started our way down the South Arete.
 Bottom of pitch 7 (photo by Steve Machuga)
We scrambled most of the the descent until we got to one of the chimneys. We opted to rappel at the rap station there and that is where we were joined by another party who had just topped out on an east face route. One of the guys, Blake, scrambled down to me and set up the next rappel at the next chimney and rapped down. They allowed us to use their rope and I rapped it to find Blake scrambling down to the base. One of his partners came down and said "its only 5.0 right?" and started scrambling the final bit as well. His other partner showed up with another rope and we rappelled to the base. The one partner who started scrambling got a bit sketched and rapped the last bit before Steve could finally rap down.
Once on the ground, we returned to our packs at the base, turned on our headlamps and hiked out.
Overall this was a great climb. Although it was 5.6, the first pitch was no doubt the crux for us. (Were we off route the entire time?) It was loose, not well protected, and strenuous. There were three really enjoyable (dare I say great?) pitches on the route and some other good pitches as well. While clouds threatened all day, they mostly stuck to bothering the nearby peaks like Silver Star and Cutthroat. It was windy and cool on route, but we did have brief moments of sun.
My pics are here.
5 miles RT
Left car: 11:15 am
Summit: 7:30 pm
Back at car: 10:00 pm
11 hours car to car
Steve and I planned a big climbing weekend. We didn't finalize our objectives until a few days before the weekend. The first leg would be an attempt on the Southwest Rib of South Early Winter Spire. Our plan was to climb South Early on Saturday, and then head to Cascade Pass to climb Forbidden on Sunday/Monday.
We had a casual start from Seattle on Saturday and arrived at the Blue Lake trail head in the late morning. Temps were cool, and it was a bit cloudy. We made awesome time to the base where we ate lunch and started to gear up. (And Steve took a "bathroom break".) There was a party on route ahead of us and they were a few pitches up. We hung our remaining gear in the tree, and headed up the direct start. [Using the description from Weekend Rock.]
Steve led off on the first pitch which was a loose and not easily protected corner. He went a little off route at one point (he called it the 5.10 variation) and was finally at the belay. I followed and found the pitch a struggle, and mostly unenjoyable. The off route variation took me some time to complete as I couldn't manage the moves Steve did and did an even different variation. This off route issue on the first pitch burned a lot of time for us, (Steve thought over and hour) but we weren't too concerned.
I led off on the next pitch which was short and if we didn't go off route on the first pitch, probably could have been combined with it. This short pitch was a moderate crack that brought you up to the next belay just below a major flake that is the following pitch. We changed over leads and Steve was on his way.
This crack is wider and has an interesting design to it with a large edge as its left side. The crack was fairly steep, and Steve headed up it straddling the flake with one leg on the face and one in the crack. There was much grunting. (Not as much as from the woman who was ahead of us-I think she was actually crying at one point.) Steve made his way up and commented about the amount of blood on the rock. He combined the pitch with the following pitch and started to bring me up. I climbed the crack with both feet in for the initial part, and then about 1/3 of the way up I used the flake for feet as my feet were killing me from jamming them in the crack. The last third of the pitch you come out and lie back the final portion. Exciting to go from the relative security of the crack out on to the face. The second pitch of this link up was a wide crack in a slab.
Top of the fourth pitch (photo by Steve Machuga)It was my turn to lead the next pitch which was a slab pitch. It starts out by going around a corner and then up a nice slab with some exposure. The book description said somewhat runout, but it was oddly only runout for the crux, which in the book was stated as being "an exciting step to the right." It was a fun pitch and I set a gear belay at the base of the bear hug cracks and brought Steve up.
Rounding the corner to gain the slab (photo by Steve Machuga)Since I had told Steve at the base that I wanted to lead the bear hug cracks, he let me lead this next pitch as well. This was a super enjoyable pitch where you head up a short crack that brings you to a small ledge at the bottom of wide double cracks. They took a touch of effort to get on, but once on them, I found the climbing easy. What was not particularly easy was protecting them. We had brought a #5 Camalot just for this pitch (although we used it on 2-3 other pitches as well.) The bear hug cracks were too wide for the #4 and so I had to move the #5 up with me at least once. Just above the cracks I was able to get in a #4 and then proceeded up a ramp to the next belay, where I brought Steve up.
Bear Hug Cracks (Photo by Steve Machuga)Steve led out on the next bit and then we started simul-climbing. (This was roughly pitches seven and eight.) He belayed me up to just below the bunny ears, and then I led a short bit to the rap anchor at the bunny ears. We rapped off the scary (freestanding block) anchor into the notch. Then Steve led the final pitch up to the summit area. It was a fun little crack that brought you up to near the summit. Since it was late in the day and clouds seemed to be rolling in, we bypassed the summit block and started our way down the South Arete.
Bottom of pitch 7 (photo by Steve Machuga)We scrambled most of the the descent until we got to one of the chimneys. We opted to rappel at the rap station there and that is where we were joined by another party who had just topped out on an east face route. One of the guys, Blake, scrambled down to me and set up the next rappel at the next chimney and rapped down. They allowed us to use their rope and I rapped it to find Blake scrambling down to the base. One of his partners came down and said "its only 5.0 right?" and started scrambling the final bit as well. His other partner showed up with another rope and we rappelled to the base. The one partner who started scrambling got a bit sketched and rapped the last bit before Steve could finally rap down.
Once on the ground, we returned to our packs at the base, turned on our headlamps and hiked out.
Overall this was a great climb. Although it was 5.6, the first pitch was no doubt the crux for us. (Were we off route the entire time?) It was loose, not well protected, and strenuous. There were three really enjoyable (dare I say great?) pitches on the route and some other good pitches as well. While clouds threatened all day, they mostly stuck to bothering the nearby peaks like Silver Star and Cutthroat. It was windy and cool on route, but we did have brief moments of sun.
My pics are here.
Friday, April 17, 2009
Mt Rainier Route Photos
 The heavy snowfall from last week slowed a number of teams, many have not made the summit. Since we're lite on route conditions, I'll share these recent climbing route photos. Here is the Nisqually Cleaver taken on May 30th.
 There are a number of climbers at Camp Muir this weekend, none have reported successful ascents. One Seattle party spent 15 hours pushing the route in from Camp Schurman, while another team summited on Liberty Ridge Thursday/Friday. The "Liberty" team took quite a bit of extra time and had to spend at least one night on top... They radioed from Camp Schurman on Saturday to report that one member had 7 digits with frostbite! We remind climbers not to underestimate how physically difficult it is to climb Liberty Ridge.
Photo by Mike Gauthier
Tuesday, April 14, 2009
Smelling Spring
Trying to smell spring out the window and trying a bite of a flower, plus just being silly kitties.


Sunday, April 12, 2009
Longmire Cabin
These photos are of the cabin used in the TV show Longmire that is one of my new favorite shows. The cabin was in the same area as the other old buildings on the Valles Caldera.Longmire is sort of a modern western. This cabin is Sheriff Walt Longmire's on the show. It has been seen on the show many times and I was sure it was on the Caldera from what I had seen. Of course I had heard it was filmed in New Mexico even though the story is set in Wyoming. I have a hard time remembering itis supposed to be Wyoming when watching it as I see places in New Mexico I have been to. They have had some trouble filming this summer due to the fire and had to change some of the filming locations because of it. A lot is filmed in the Jemez Mountains and some in Los Vegas, New Mexico. I understand it will start being shown in Canada and England as well as in theUS.Oddly the main star is an Australianactor named Robert Taylor, who is a good actor. Lou Diamond Phillipsis also on the show. http://www.aetv.com/longmire/index.jsp

Of course I almost missed these photos as my camera decided it needed fresh batteries right then.


Of course I almost missed these photos as my camera decided it needed fresh batteries right then.
Tuesday, April 7, 2009
Yosemite Valley
Monday, April 29th - - It was 24 miles from the Hodgdon Meadow campground to "The Valley" area, which took about an hour to get there - and it wasn't because of the traffic either! It was simply the nature of the route going up and down and over and around and even through the mountains. Luckily the road into the valley was wider than the road to Hetch-Hetchy!

The late afternoon light was incredible.

Upper Yosemite Falls.

Bridalveil Falls.

Bridalveil Falls from one of the pull-outs along the road back to Hodgdon Meadow. As always, double-click on the image to view a larger version...

Same view, zoomed in a lot. This really shows the "hanging valley" created when the glaciers receded many eons ago leaving Bridalveil creek with nowhere to go except down!
The late afternoon light was incredible.
Upper Yosemite Falls.
Bridalveil Falls.
Bridalveil Falls from one of the pull-outs along the road back to Hodgdon Meadow. As always, double-click on the image to view a larger version...
Same view, zoomed in a lot. This really shows the "hanging valley" created when the glaciers receded many eons ago leaving Bridalveil creek with nowhere to go except down!
An Iris from the Pioneer Garden


These were in the “Pioneer Garden” near the Library.Photos taken Saturday, June 4th
Subscribe to:
Comments (Atom)